C#基本
C#是一种面向对象的编程语言。在面向对象的程序设计方法中,程序有各种相互交互的对象组成。相同种类的对象通常具有相同的类型,或者说,在同一Class中。
C#代码基本结构
using关键字
在任何C#程序中的第一条语句都是:
using systemusing关键字用于在程序中包含命名空间,一个程序可以包含多个using语句。
class关键字
class关键字用于声明一个类,类是一种数据结构,可以封装数据成员、方法成员和其他的类。
C#中所有的语句都必须包含在类中。
类名是一种标识符,必须符合标识符的命名规则。
Main方法
一个C#程序中只能有一个入口点(Mian方法)
Main方法默认访问级别为private
可以用三种修饰符修饰Main方法:Pubic,Static,Void
Public:说明Mian方法是公有的,在类的外面也可以调用该方法。
Static:说明Main方法是一个静态方法,即这个方法属于类的本身而不是这个类的特定对象。调用静态方法不能使用类的实例化对象,必须直接使用类名来调用。
Void:说明Main方法是无返回值的
在Main方法中捕获异常信息并输出:try……catch(Exception)
成员变量
变量是类的属性或数据成员,用于存储数据。
成员函数
函数是一系列执行指定任务的语句,类的成员函数是在类内生命的
实例化类
类是一个概念,只有将类实例化才能够实际上读取数据成员或者成员函数
设置版本和帮助信息
为C#程序设置版本和帮助信息,在“解决方案资源管理器”中找到
C#数据类型
值类型
值类型变量可以直接分配给一个值,值类型直接包含数据。
引用类型
引用类型不包含存储在变量中的实际数据,但它们包含对变量的引用。
换句话说,它们指的是一个内存位置。使用多个变量时,引用类型可以指向一个内存位置。如果内存位置的数据是有一个变量改变的,其他变量会自动反映这种值的变化。内置的引用类型有:object、dynamic、string
Try…Catch…
1、代码放到try快中(try是c#的关键字)。代码运行是,会尝试执行try块内部的语句,如果么有语句发生异常,这些语句将顺序执行下去。直到全部都完成,但是一旦出现异常就跳出try块,执行catch块中的内容。
2、try块需要一个或者多个catch块程序捕捉并处理特定类型的异常。
InitializeComponent()方法
InitializeComponent()方法:由系统生成的对窗体界面的定义方法
public MainWindow()
{
    InitializeComponent();
}
InitializeComponent方法定义哪里
我们定位到那个方法转到定义,发现没反应。
实际上这个方法是编译时WPF会为我自动生成,编译后在下面红色标注的地方打开MainWindow.g.cs,在这个文件可以找到这个方法的定义
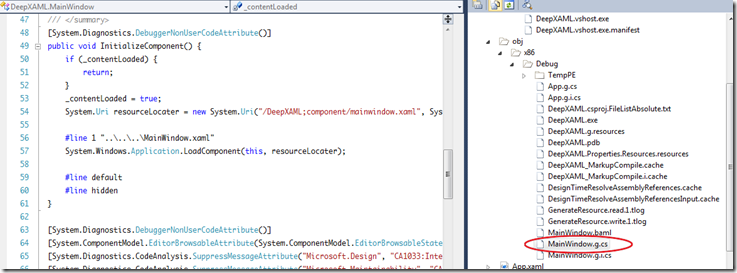
在每个窗口建立后,都会同时产生程序代码文件,即.cs文件,以及与之相匹配的.Designer.CS文件,业务逻辑以及事件方法等被编写在.CS文件中,而界面设计规则被封装在.Designer.CS文件中
InitializeComponent()方法和Dispose()方法,前者为界面设计的变现内容,后者为表单释放系统资源时候执行编码。
InitializeComponent()方法反映了窗体设计器中窗体和控件的属性。通常不会在这个文件中修改代码。如果更改InitializeComponent()方法中的相关属性参数,在窗体设计器界面上也会显示出来。
partial 表示以下创建的是分布类代码
也就是说 一个类的定义代码 可以写在两个不同的页面
Form1.cs和Form1.Designer.cs
注意:InitializeComponent()方法写在前面和后面是有区别的。InitializeComponent()方法是用来初始化窗体组件的,在InitializeComponent之前,窗体的各个控件还没有进行初始化,比如说窗体上有一个TextBoxUserName,在InitializeComponent之前它还只是一个TextBox类型的变量而已,如果在InitializeComponent之前调用这个TextBox的属性或方法,就会出错。再比如说你拖上取一个TextBox,它放在Form的位置,TextBox的一些属性。包括new 这个TextBox都放在那个函数里面处理的。
我们可以看一下Form.Designer.cs,在那里找到InitializeComponent方法,您会发现窗体对象的初始化都是在那里做的。
类型转换
基本的类型转换:https://www.runoob.com/csharp/csharp-type-conversion.html
类型转换:https://www.cnblogs.com/minotauros/p/11440040.html
讲解的比较详细:https://blog.csdn.net/wu_l_v/article/details/78989303
C#文件读写
添加命名控件
System.IO;
System.Text;
文件读取
使用FileStream类进行文件的读取 ,并将它转换成char数组,然后输出
byte[] byData = new byte[100];
char[] charData = new char[1000];
public void Read()
{
  try
   {
     FileStream file = new FileStream("E:\\test.txt", FileMode.Open);
     file.Seek(0, SeekOrigin.Begin);
     file.Read(byData, 0, 100);      //byData传进来的字节数组,用以接受FileStream对象中的数据,第2个参数是字节数组中开始写入数据的位置,它通常是0,     //表示从数组的开端文件中向数组写数据,最后一个参数规定从文件读多少字符.
     Decoder d = Encoding.Default.GetDecoder();
     d.GetChars(byData, 0, byData.Length, charData, 0);
     Console.WriteLine(charData);
     file.Close();
    }
   catch (IOException e)
   {
      Console.WriteLine(e.ToString());
   }
}
使用StreamReader读取文件,然后一行一行的输出。
public void Read(string path)
{
    StreamReader sr = new StreamReader(path,Encoding.Default);
    String line;
    while ((line = sr.ReadLine()) != null)
    {
     Console.WriteLine(line.ToString());
    }
}
文件写入
使用FileStream类创建文件,然后将数据写入到文件里。
public void Write()
{
   //FileMode.Append为不覆盖文件效果.create为覆盖   FileStream fs = new FileStream("E:\\ak.txt", FileMode.Create);
   //获得字节数组
   byte[] data = System.Text.Encoding.Default.GetBytes("Hello World!");
   //开始写入
   fs.Write(data, 0, data.Length);
   //清空缓冲区、关闭流
   fs.Flush();
   fs.Close();
}
使用FileStream类创建文件,使用StreamWriter类,将数据写入到文件。
public void Write(string path)
{
   FileStream fs = new FileStream(path, FileMode.Create);
   StreamWriter sw = new StreamWriter(fs);
   sw.Write("Hello World!!!!");//开始写入
   sw.Flush();//清空缓冲区
   sw.Close();//关闭流
   fs.Close();
}
C# List
LIST概述
**所属命名空间:**System.Collections.Generic
public class List
List类是 ArrayList 类的泛型等效类。该类使用大小可按需动态增加的数组实现 IList 泛型接口。
泛型的好处: 它为使用c#语言编写面向对象程序增加了极大的效力和灵活性。不会强行对值类型进行装箱和拆箱,或对引用类型进行向下强制类型转换,所以性能得到提高。
性能注意事项:
在决定使用IList 还是使用ArrayList类(两者具有类似的功能)时,记住IList 类在大多数情况下执行得更好并且是类型安全的。
如果对IList 类的类型 T 使用引用类型,则两个类的行为是完全相同的。但是,如果对类型 T 使用值类型,则需要考虑实现和装箱问题。
“添加到 ArrayList 中的任何引用或值类型都将隐式地向上强制转换为 Object。如果项是值类型,则必须在将其添加到列表中时进行装箱操作,在检索时进行取消装箱操作。强制转换以及装箱和取消装箱操作都会降低性能;在必须对大型集合进行循环访问的情况下,装箱和取消装箱的影响非常明显。”
一般用法
List的基础、常用方法:
声明:
1、List
T为列表中元素类型,现在以string类型作为例子
E.g.: List
2、List
以一个集合作为参数创建List
E.g.:
string[] temArr = { “Ha”, “Hunter”, “Tom”, “Lily”, “Jay”, “Jim”, “Kuku”, “Locu” };
List
添加元素
1、 List. Add(T item) 添加一个元素
E.g.: mList.Add(“John”);
2、 List. AddRange(IEnumerable
E.g.:
string[] temArr = { "Ha","Hunter", "Tom", "Lily", "Jay", "Jim", "Kuku", "Locu" };

mList.AddRange(temArr);
3、Insert(int index, T item); 在index位置添加一个元素
E.g.: mList.Insert(1, “Hei”);
遍历List中元素
foreach (T element in mList) //T的类型与mList声明时一样

 {

   Console.WriteLine(element);

 }
E.g.:
foreach (string s in mList)
{
Console.WriteLine(s);
}
删除元素
1、 List. Remove(T item) 删除一个值
E.g.: mList.Remove(“Hunter”);
2、 List. RemoveAt(int index); 删除下标为index的元素
E.g.: mList.RemoveAt(0);
3、 List. RemoveRange(int index, int count);
从下标index开始,删除count个元素
E.g.: mList.RemoveRange(3, 2);
判断某个元素是否在该List
List. Contains(T item) 返回true或false,很实用
E.g.:
if (mList.Contains(“Hunter”))
{
Console.WriteLine(“There is Hunter in the list”);
}
else
{
mList.Add(“Hunter”);
Console.WriteLine("Add Hunter successfully.");}
给List里面元素排序
List. Sort () 默认是元素第一个字母按升序
E.g.: mList.Sort();
给List里面元素顺序反转
List. Reverse () 可以与List. Sort ()配合使用,达到想要的效果
E.g.: mList.Sort();
List清空
List. Clear ()
E.g.: mList.Clear();
获得List中元素数目
List. Count () 返回int值
E.g.:
int count = mList.Count();
Console.WriteLine("The num of elements in the list: " +count);List的进阶、强大方法
举例用的List:
string[] temArr = { Ha","Hunter", "Tom", "Lily", "Jay", "Jim", "Kuku", " "Locu" };

mList.AddRange(temArr);
List.Find方法
搜索与指定谓词所定义的条件相匹配的元素,并返回整个 List 中的第一个匹配元素。
public T Find(Predicate
Predicate是对方法的委托,如果传递给它的对象与委托中定义的条件匹配,则该方法返回 true。当前 List 的元素被逐个传递给Predicate委托,并在 List 中向前移动,从第一个元素开始,到最后一个元素结束。当找到匹配项时处理即停止。
Predicate 可以委托给一个函数或者一个拉姆达表达式:
委托给拉姆达表达式:
E.g.:
string listFind = mList.Find(name => //name是变量,代表的是mList

  {               //中元素,自己设定

    if (name.Length > 3)

    {

      return true;

    }

      return false;

   });

   Console.WriteLine(listFind);   //输出是Hunter
委托给一个函数:
E.g.:
string listFind1 = mList.Find(ListFind); //委托给ListFind函数

Console.WriteLine(listFind);      //输出是Hunter
ListFind函数
public bool ListFind(string name)

{

  if (name.Length > 3)

    {

     return true;

    }

      return false;

}
这两种方法的结果是一样的。
List.FindLast方法
搜索与指定谓词所定义的条件相匹配的元素,并返回整个 List 中的最后一个匹配元素。
public T FindLast(Predicate
用法与List.Find相同。
List.TrueForAll方法
确定是否 List 中的每个元素都与指定的谓词所定义的条件相匹配。
public bool TrueForAll(Predicate
委托给拉姆达表达式:
E.g.:
bool flag = mList.TrueForAll(name =>

  {

    if (name.Length > 3)

    {

     return true;

    }

    else

     {

      return false;

      }

   }

 );

Console.WriteLine("True for all: "+flag); //flag值为false委托给一个函数,这里用到上面的ListFind函数:
E.g.:
 bool flag = mList.TrueForAll(ListFind); //委托给ListFind函数

Console.WriteLine("True for all: "+flag); //flag值为false
这两种方法的结果是一样的。
List.FindAll方法
检索与指定谓词所定义的条件相匹配的所有元素。
public List
E.g.:
List<string> subList = mList.FindAll(ListFind); //委托给ListFind函数

 foreach (string s in subList)

  {

   Console.WriteLine("element in subList: "+s);

}这时subList存储的就是所有长度大于3的元素List.Take(n)
获得前n行 返回值为IEnumetable
E.g.:
IEnumerable<string> takeList= mList.Take(5);

foreach (string s in takeList)

 {

   Console.WriteLine("element in takeList: " + s);

}这时takeList存放的元素就是mList中的前5个List.Where方法
检索与指定谓词所定义的条件相匹配的所有元素。跟List.FindAll方法类似。
E.g.:
IEnumerable<string> whereList = mList.Where(name =>

     {

        if (name.Length > 3)

        {

          return true;

        }

        else

        {

          return false;

        }

     });

   foreach (string s in subList)

   {

     Console.WriteLine("element in subList: "+s);

}这时subList存储的就是所有长度大于3的元素List.RemoveAll方法
移除与指定的谓词所定义的条件相匹配的所有元素。
public int RemoveAll(Predicate
E.g.:
mList.RemoveAll(name =>

       {

         if (name.Length > 3)

         {

           return true;

         }

         else

         {

           return false;

         }

       });

     foreach (string s in mList)

     {

       Console.WriteLine("element in mList:   " + s);

     }
这时mList存储的就是移除长度大于3之后的元素。
List
比如
List
intList.Add(34); //添加
intList.Remove(34);//删除
intList.RemoveAt(0); //删除位于某处的元素
intList.Count; //链表长度
还有Insert,Find,FindAll,Contains等方法,也有索引方法 intList[0] = 23;
1.减少了装箱拆箱
2.便于编译时检查数据类型
List
C#List和string[]之间的相互转换
1.从System.String[]转到List<System.String>
List<System.String> List = new List<System.String>(); string[] str={"1","2","3"};
List = new List<System.String>(str);
2.从List<System.String>转到System.String[]
List<System.String> List = new List<System.String>(); List.Add("1");
List.Add("2");
List.Add("3");//添加数据
System.String[] str = { };
str = List.ToArray();
3.字符串数组可以,其他有些类型像int数组等等的也是可以的。
C# 字符分割
Split()函数
Split方法提供了字符分割的几种方法
String.Split方法提供了如下6个重载函数:
| 名称 | 说明 |
|---|---|
| String.Split (Char[]) | 返回包含此实例中的子字符串(由指定 Char 数组的元素分隔)的 String 数组。由 .NET Compact Framework 支持。 |
| String.Split (Char[], Int32) | 返回包含此实例中的子字符串(由指定 Char 数组的元素分隔)的 String 数组。参数指定返回的子字符串的最大数量。 |
| String.Split (Char[], StringSplitOptions) | 返回包含此字符串中的子字符串(由指定的 Char 数组的元素分隔)的 String 数组。参数指定是否返回空数组元素。 |
| String.Split (String[], StringSplitOptions) | 返回包含此字符串中的子字符串(由指定的 String 数组的元素分隔)的 String 数组。参数指定是否返回空数组元素。 |
| String.Split (Char[], Int32, StringSplitOptions) | 返回包含此字符串中的子字符串(由指定的 Char 数组的元素分隔)的 String 数组。参数指定要返回子字符串的最大数量,以及是否要返回空数组元素。 |
| String.Split (String[], Int32, StringSplitOptions) | 返回包含此字符串中的子字符串(由指定的 String 数组的元素分隔)的 String 数组。参数指定要返回子字符串的最大数量,以及是否要返回空数组元素。 |
以下详细举例说明:
String.Split(Char[])
string str = "aaatbbscctdd";

string []strArray = str.Split(new char[]{'t'}); 或string []strArray = str.Split('t'); //单字符切割(result : "aaa" "bbscc" "dd")

string []strArray = str.Split(new char[]{'t','s'}); //多字节切割(result : "aaa" "bb" "cc" "dd")
String.Split(Char[],Int32)
string str = "aaatbbscctdd";

string []strArray = str.Split(new char[]{'t',2});//只切割成2份(result :"aaa" "bbscctdd")
String.Split(Char[],StringSplitOptions)
string str = "aaatbbscctddt";

string []strArray = str.Split(new char[]{'t',StringSplitOptions.RemoveEmptyEntries});//去除空元素(result :"aaa" "bbscc" "dd")

string []strArray = str.Split(new char[]{'t',StringSplitOptions.None});//保留空元素(result :"aaa" "bbscc" "dd" “”)
String.Split(String[],StringSplitOptions)
string str = "aaatbbscctddt";

string []strArray = str.Split(new String[]{"t",StringSplitOptions.RemoveEmptyEntries});//去除空元素(result :"aaa" "bbscc" "dd")

string []strArray = str.Split(new String[]{"t",StringSplitOptions.None});//保留空元素(result :"aaa" "bbscc" "dd" “”)
String.Split(Char[],Int32,StringSplitOptions)
string str = "aaatbbscctddt";

string []strArray = str.Split(new char[]{'t',2,StringSplitOptions.RemoveEmptyEntries});//切割成2份且去除空元素(result :"aaa" "bbscctddt")

string []strArray = str.Split(new char[]{'t',2,StringSplitOptions.None});//切割成2份且保留空元素(result :"aaa" "bbscctddt" “”)
String.Split(String[],Int32,StringSplitOptions)
string str = "aaatbbscctddt";

string []strArray = str.Split(new String[]{"t",2,StringSplitOptions.RemoveEmptyEntries});//切割成2份且去除空元素(result :"aaa" "bbscctddt")

string []strArray = str.Split(new String[]{"t",2,StringSplitOptions.None});//切割成2份且保留空元素(result :"aaa" "bbscctddt" “”)
正则匹配
正则匹配拆分字符串提供了5个重载函数:
| 名称 | 说明 |
|---|---|
| Regex.Split (String) | 在由Regex 构造函数中指定的正则表达式模式定义的位置拆分指定的输入字符串。由 .NET Compact Framework 支持。 |
| Regex.Split (String, Int32) | 在由 Regex 构造函数中指定的正则表达式定义的位置,将指定的输入字符串拆分指定的最大次数。由 .NET Compact Framework 支持。 |
| Regex.Split (String, String) | 在由正则表达式模式定义的位置拆分输入字符串。由 .NET Compact Framework 支持。 |
| Regex.Split (String, Int32, Int32) | 从输入字符串中的指定字符位置开始,在由 Regex 构造函数中指定的正则表达式定义的位置,将指定的输入字符串拆分指定的最大次数。由 .NET Compact Framework 支持。 |
| Regex.Split (String, String, RegexOptions) | 在由指定的正则表达式模式定义的位置拆分输入字符串。可指定选项来修改匹配的行为。 |
添加命名空间
using System.Text.RegularExpressions;函数demo
Regex.Split(String,String)
string str = “aaatsbbtscctsdd”;
stirng []strArray = Regex.Split(str,”ts”); //正则匹配切割(result: “aaa” “bb” “cc” “dd”);
Regex.Split(String,String)
string str = “aaatsbbtscctsdd”;
stirng []strArray = Regex.Split(str,”ts”,RegexOptions.IgnoreCase); //正则匹配切割(result: “aaa” “bb” “cc” “dd”);
字符分割应用
单字符拆分
string str = "aaatbbscctdd";

string []strArray = str.Split(new char[]{'t'}); 或string []strArray = str.Split('t'); //单字符切割(result : "aaa"  "bbscc"  "dd")
多字符拆分
string str = "aaatbbscctdd";

string []strArray = str.Split(new char[]{'t','s'}); //多字节切割(result : "aaa" "bb" "cc" "dd")
字符串拆分
using System.Text.RegularExpressions;

string str = "aaatsbbtscctsdd";

stirng []strArray = Regex.Split(str,"ts",RegexOptions.IgnoreCase); //正则匹配切割且(result: "aaa" "bb" "cc" "dd");
或者
string str = "aaatsbbtscctsdd";

string []strArray = str.Split(new string[]{"ts"}); //字符串切割(result : "aaa" "bb" "cc" "dd")
注意
String.Split方法没有重载String.Split(stirng [])方法,也就是说str.Split(“t”)或者str.Split(new string[]{“ts”,”dd”})都是错误的。
除了切割单字符可用String.Split(‘t’)外,其它的都必须用String.Split(new char[]{})这样的格式,否则编译会出错
功能实现小记
WPF打开网页实现
浏览器打开
添加头文件引用
using System.Diagnostics;Process proc = new System.Diagnostics.Process();
proc.StartInfo.FileName = "http://www.baidu.com";
proc.Start();WPF应用程序中打开
WebBrowser wBrowser = new WebBrowser();
wBrowser .Source = new Uri("http://www.baidu.com");
this.Content = wBrowser ;
WPF插入超链接
前端XAML:
值得注意的一点是,超链接的文字一定要包含在<hyperlink></hyperlink>标记中,否则报错。并且<hyperlink></hyperlink>标记不可以单独出现,一定要嵌套在textblcok中
<TextBlock>
        <Hyperlink NavigateUri="http://www.nlecloud.com/my/forget"
                   Click="ForgotPassword_Click"
                   Name="ForgotPassword">
          忘记密码
        </Hyperlink>
</TextBlock>
后端C#:
private void ForgotPassword_Click(object sender, RoutedEventArgs e)
        {//忘记密码
            Hyperlink link = sender as Hyperlink;
            Process.Start(new ProcessStartInfo(link.NavigateUri.AbsoluteUri));
        }
坑:窗口全局的MoseMove事件会影响超链接标记的点击属性,导致超链接点击事件不发生的情况。
实现Image控件点击事件
为Image控件设置鼠标点击事件
<Image
                            ToolTip="进入新大陆物联网云"
                            MouseLeftButtonDown="Image_MouseLeftButtonDown"
                            Width="120" Height="50"
                            >
在后台代码中写出点击事件的逻辑实现
private void Image_MouseLeftButtonDown(object sender, MouseButtonEventArgs e)
        {
            Process proc = new System.Diagnostics.Process();
            proc.StartInfo.FileName = "http://www.nlecloud.com/";
            proc.Start();
        }
HeaderStringFormat 属性
获取或设置一个撰写字符串,该字符串指定如果 Header 属性显示为字符串,应如何设置该属性的格式。
[System.ComponentModel.Bindable(true)]
public string HeaderStringFormat { get; set; }
属性值
- String
一个撰写字符串,指定如果 Header 属性显示为字符串,应如何设置该属性的格式。 默认值为null。 - 属性
BindableAttribute
示例
下面的示例将绑定 TabControl 到对象的集合 Student 。 Student类具有一个 Name 属性和一个对象的集合 Course ,并实现了 IFormattable.ToString 返回 Name 学生或列出学生课程的字符串的方法。 该示例使用将 HeaderStringFormat 学生的名称放在 Header 从) 继承的每个 (的中 TabItem HeaderedContentControl ,并使用 TabControl.ContentStringFormat 来为的内容中的每个学生显示课程列表 TabItem 。
<Grid>
  <Grid.Resources>
    <src:Students x:Key="Students"/>

    <Style TargetType="TabItem">
      <Setter Property="HeaderStringFormat" Value="n"/>
      <Setter Property="FontFamily" Value="Lucida Sans Unicode"/>
      <Setter Property="Foreground" Value="Green"/>
      <Setter Property="FontWeight" Value="Bold"/>
    </Style>
  </Grid.Resources>

  <TabControl ItemsSource="{StaticResource Students}"
              FontFamily="Lucida Console" Foreground="Navy"
              ContentStringFormat="cl"/>
</Grid>
下面的示例实现 IFormattable.ToString 方法以返回 Name 学生的或列出学生课程的字符串。
public string ToString(string format, IFormatProvider formatProvider)
{
    // 'n': print the name only.
    if (format == "n")
    {
        return Name;
    }

    // 'cl': print the course list.
    if (format == "cl")
    {
        string stringFormat = "{0,-25}{1,-30}{2,-10}\r\n";

        StringBuilder str = new StringBuilder();

        str.AppendLine();
        str.AppendFormat(stringFormat, "Title", "Description", "ID");
        str.AppendLine();

        foreach (Course c in Courses)
        {
            str.AppendFormat(stringFormat, c.Title, c.Description, c.SectionID);
        }

        return str.ToString();
    }

    return this.ToString();
}
注解
HeaderStringFormat 可以是预定义的复合字符串格式。 有关字符串格式的详细信息,请参阅 格式设置类型。 如果设置 HeaderTemplate 了或的 HeaderTemplateSelector 属性,则将 HeaderedContentControl HeaderStringFormat 忽略属性。
依赖项属性信息
| 标识符字段 | HeaderStringFormatProperty |
元数据属性设置为true |
无 |
Xaml控件不可用属性
isEnable = "False"登录文本框判空提示
getUsername.text == null;

getPassword.password == null;
ToolTip提示控件
ToolTip控件可以在鼠标移动到某控件上后弹出提示的控件
< Button Content ="Button" HorizontalAlignment ="Left" Margin ="80,58,0,0" VerticalAlignment ="Top" Width ="75">
           < Button.ToolTip >
               < ToolTip Placement ="Right">
                   < TextBlock >
                   按钮tooltip
                   </ TextBlock >
               </ ToolTip >
           </ Button.ToolTip >
       </ Button >
其中Placement用来确定Tooltip提示框出现的位置。
对于StackPanel的控件,如下所示:
< StackPanel.ToolTip >
  < ToolTip Placement ="Center">
 	 < TextBlock >
 		 第一个按钮
 	 </ TextBlock >
  </ ToolTip >
</ StackPanel.ToolTip >
对于ToolTip的控制,还提供了ToolTipService类,ToolTipService是一个静态类,表示一个服务,该服务提供用于控制提示的显示和行为的属性和事件。
< Button ToolTipService.Placement ="Center" ToolTipService.BetweenShowDelay ="1000" ToolTipService.ToolTip ="按钮提示"  Content ="Button" HorizontalAlignment ="Left" Margin ="80,58,0,0" VerticalAlignment ="Top" Width ="75">
	< Button.ToolTip >
		< ToolTip Placement ="Right">
			< TextBlock >
 				按钮tooltip
			</ TextBlock >
		</ ToolTip >
	</ Button.ToolTip >
</ Button >
ToolTipService主要属性
ToolTipService.InitialShowDelay="1000"  //获取或设置工具提示打开前的时间长度

ToolTipService.ShowDuration="7000" //显示时间

ToolTipService.BetweenShowDelay="2000"//获取或设置两个工具提示显示之间的最大时间(第二个工具提示不经延迟即会出现)。

ToolTipService.Placement="Right"//工具提示相对原控件打开时的方向,并指定工具提示在与屏幕边界重叠时的行为。

ToolTipService.PlacementRectangle="50,0,0,0"//获取或设置相对于其来放置工具提示的矩形区域。

ToolTipService.HorizontalOffset="10"//获取或设置由 PlacementRectangle 和 PlacementTarget 属性为工具提示指定的区域的左侧偏移量。

ToolTipService.VerticalOffset="20"//获取或设置由 PlacementRectangle 和 PlacementTarget 属性为工具提示指定的区域的顶部距离。

ToolTipService.HasDropShadow="False"//获取或设置工具提示是否显示投影效果。

ToolTipService.IsEnabled="True"//获取或设置是否显示工具提示。
DispatcherTimer线程
什么是 DispatcherTimer? DispatcherTimer是一种定时器!
public MainWindow()
{
    InitializeComponent();
    this.Loaded += MainWindow_Loaded;


}
DispatcherTimer time;//实例化一个定时器

void MainWindow_Loaded(object sender,RoutedEventArgs e)
{
    time = new DispatcherTimer();
    time.Interval = TimeSpan.FromSeconds(3000);
    time.Tick += time_tick;
    time.Start();

}
void time_tick (object sender,EventArgs e)
{

}
WPF窗体出现位置
如何设置WPF窗体在屏幕上显示的位置?
方法一
在后台代码中添加
public Login()
{
InitializeComponent();
WindowStartupLocation = WindowStartupLocation.CenterScreen;//WPF窗体在屏幕上居中
}
方法二
在XAML代码中添加
WindowStartupLocation="CenterScreen"获取当前桌面路径
string strDesktopPath = Environment.GetFolderPath(Environment.SpecialFolder.DesktopDirectory);//用函数获取当前电脑的桌面路径保存为string类型的变量WPF窗体无边框
WPF做这样的窗口非常简单,只有需在窗口设计中设置两个属性,一个是AllowsTransparency, 设置为 Ture; 一个是 WindowStyle, 设置为 None。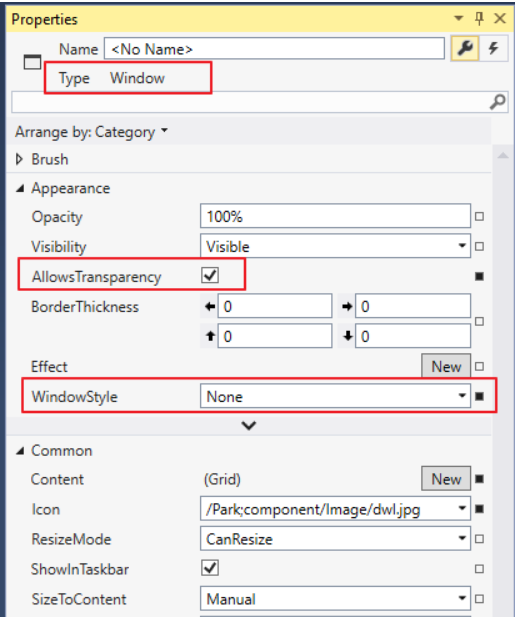
注:是Window的属性,不要选中其他的控件。
另外,如果AllowsTransparency=”True”,那么 WindowStyle只能为 None, VS2015 已经做到连动设置,只要勾选AllowsTransparency,后一个也跟着变了。但 VS2008 还是需要用户分别设置,不然会报错。
还有一个问题不得不提,AllowsTransparency=”True” 之后就无法使用 WindowsFormsHost控件了,因为就算用了,WFH里的任何控件也是透明无法显示出来的,比如ReportViewer
WPF窗体拖动
标题栏上有最大化最小化和关闭的按钮,其中在登录窗口我们一般是不会使用最大化按钮的。可是不得不说,标题栏还有一个很实用的作用,就是可以拖拽整个窗口,用户只要单击标题栏不放,就可以拖到桌面的任何地方。如今把标题栏隐藏之后,该如何弥补呢?
private void Window_MouseLeftButtonDown(object sender, MouseButtonEventArgs e)
        {
            try
            {
                this.DragMove();
            }
            catch { }
        }
网上很多教程到这一步就结束了,对我这种没有精通C#的人来说很不友善,实际上还需要为窗体XAML添加一个事件,代码如下,其他有关窗体操作的内容以此类推:
MouseMove="Window_MouseLeftButtonDown"注:网上有些示例里,没有用 try{}catch{},而只有一行代码
this.DragMove();如果在登录窗口,只有那么几个控件和事件的话,应该也是无大碍的。
在这里有个小小的经验必须分享一下:由于在主界面里也使用了这种无标题栏的窗口,鼠标在Gridview上操作时,经常会引发异常崩溃。所以最好加 try…catch… 避免异常,哪怕是登录窗口也不例外。
设置允许拖动区域
这里遇到一点问题,当窗体中有RichTextBox这种能输入的控件时,在控件中按下左键拖动鼠标就会报错,估计是控件本身的鼠标拖动和窗体的冲突。再者,我们在这些控件中拖动鼠标的目的是选择文字,而不是拖动窗口,这时就需要设置相应区域:
private void BackGround_MouseMove(object sender, MouseEventArgs e)
    {
      Point pp = Mouse.GetPosition(this);
      if (pp.X >= 20 && pp.X <= 288 && pp.Y>=78 && pp.Y <= 460)
      	{

      	}
      else
      {
        if (e.LeftButton == MouseButtonState.Pressed)
        {
          //this.DragMove();
          Window.DragMove();
        }
      }
    }
输入密码回车登录
很多网站会注意这种情况,输入密码后回车,系统就可以登录,这就是良好的用户体验。(当然,也有些网站不注意用户体验,用户必须用鼠标去点击登录的)
其实在密码框添加一个 KeyDown 事件就可以
private void txt_Pwd_KeyDown(object sender, KeyEventArgs e)
{
    switch (e.Key)
    {
        case Key.Enter:
            btn_login_Click(btn_login, null);
            break;

        default:
            break;
    }
}
同时需要在Xaml文件中添加键盘点击事件名称声明:
Keyboard.KeyDown="txt_Pwd_KeyDown"WPF退出程序
当处于全屏模式下时,没有右上角的退出按钮,此时需要手动写button退出功能。
调用下面语句可以直接退出。
Application.Current.Shutdown();踩坑
HandyControl与LiveCharts使用出现图形位置偏移问题
HandyControl是一套WPF控件库,它几乎重写了所有原生样式,同时包含70余款自定义控件(正逐步增加)。
此处为HandyControl源码传送门,希望能对它能有所了解
问题
由于HandyControl作为WPF的一款UI库,暂时没有考虑过增加,数据图形控件,对于需要数据统计图形展示的用户,可能引入LiveCharts做数据展示处理,运行之后,出现之前好好的控件,显示效果中,图形位置偏移走样问题。
现象
引用HandyControl前,感觉生活很美好
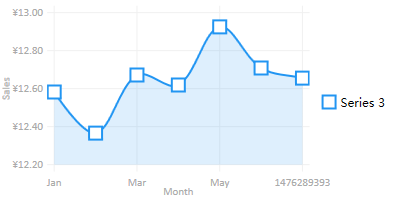
引入HandyControl后,世界都懵逼了
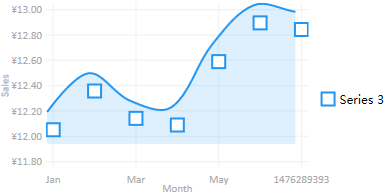
原因
由于HandyControl本身重写了几乎所有的原生样式,当然也包括了Path的默认样式,详细修改处👉传送门
<Style TargetType="Path">
        <Setter Property="Stretch" Value="Uniform"/>
</Style>
方案
清除HandyControl影响,设置Path的Style为空,引入位置,一般在App.xaml中或者使用LiveCharts控件的父级资源中
<Style TargetType="Path" BasedOn="{x:Null}"/>解决方案出处:https://www.cnblogs.com/guanguanchangyu/p/12604090.html
错误error
未将对象引用设置到对象的实例
完整错误:System.NullReferenceException:未将对象引用设置到对象的实例
错误场景:
public static int numberPeople()
       {//当前排队人数
           SensorDataFuzzyQryPagingParas query = new SensorDataFuzzyQryPagingParas()
           {
               DeviceID=119374,
               ApiTags = "number_up"
           };
           var yxh = SDK.GetSensorDatas(query, TempInfo.API_HOST);
 		   /*
   		 修改前
   		 return yxh.ResultObj.count;
   	 */
           if(yxh.IsSuccess())
           {
               return yxh.ResultObj.Count;
           }
           else
           {
               return 0;
           }
错误原因:出现这个问题是因为引用的对象是null或empty导致
声明变量时:T t = null;(T为类名),此时在栈上有一个地址。地址占4个字节,但地址没有任何指向,即指向内容为空。如果调用T的成员函数,出错:未将对象引用设置到对象实例
不能在变量声明中指定数组大小
不能在变量声明中指定数组大小(请尝试使用“new”表达式初始化)
将大小指定为数组声明的一部分时会发生此错误。 若要解决此错误,请使用 new 运算符表达式。
下面的示例生成 CS0270:
// CS0270.cs
// compile with: /t:module

public class Test
{
   int[10] a;   // CS0270
   // To resolve, use the following line instead:
   // int[] a = new int[10];
}
动态图表LiveCharts
推荐阅读
基本图表图线建立:http://www.manongjc.com/detail/14-bpxrwoalubxfjxk.html
基本图形的数据绑定:https://www.liangzl.com/get-article-detail-172477.html
mychart.Series = new SeriesCollection
           {
               new LineSeries
               {
                   Values = new ChartValues<int>(temp),
                   DataLabels=true,
                   Title = "当前人数"
               }

           };

           //myAxisX.Labels = new[] { "", "", "", "", "","","","","","" };//横坐标定义
           DateTime now = new DateTime();

           for (int j = 0; j < 10; j++)
           {
               time1[j] = now.ToString();

           }
           myAxisX.Labels = time1;
           myAxisY.MaxValue = 10;//纵坐标最大值定义
           //myAxisY.LabelFormatter = value => value.ToString("0%");
           myAxisY.Title = "人数";//纵坐标标题
设置曲线
LineSeries mylineseries = new LineSeries();//首先实例化一条折线

mylineseries.Title = "night";//设置折线名称

mylineseries.Stroke = System.Windows.Media.Brushes.Black;//设置折线颜色

mylineseries.StrokeThickness = 10;//设置折线粗细

mylineseries.StrokeDashArray = new System.Windows.Media.DoubleCollection { 2 };//设置折线样式

mylineseries.LineSmoothness = 1;//设置折线是否光滑

mylineseries.Fill = System.Windows.Media.Brushes.LightBlue;//设置折线填充颜色
设置图表
<lvc:CartesianChart x:Name="mychart" Series="{Binding SeriesCollection}"/ >//首先在前台给图表命名

mychart.Background = System.Windows.Media.Brushes.Gray;//设置图表的背景颜色

mychart.LegendLocation = LegendLocation.Top;//设置图示位置
设置轴线
//首先在前台对轴线命名
<lvc:CartesianChart.AxisX>
<lvc:Axis x:Name="myaxisx"/>
</lvc:CartesianChart.AxisX>
myaxisx.Separator.StrokeThickness = 10;//设置轴线粗细
myaxisx.Separator.Step = 0.5;//设置轴线间隔
myaxisx.Title = "Date";//设置轴线标题
myaxisx.Position = AxisPosition.RightTop;//设置轴线标题
myaxisx.Labels = new[]{ "Mon", "Tue","Wen","Thu","Fri","Sat","Sun"};//设置坐标轴标签
myaxisx.LabelsRotation = 45;//设置坐标轴标签旋转角度设置提示
//首先在前台对提示命名
<lvc:CartesianChart.DataTooltip>
<lvc:DefaultTooltip x:Name="mytooltip"/>
</lvc:CartesianChart.DataTooltip>
mytooltip.Background = System.Windows.Media.Brushes.LightCyan;//设置提示的背景颜色
mytooltip.SelectionMode = TooltipSelectionMode.OnlySender;//设置提示的选择模式
mytooltip.CornerRadius = new CornerRadius(5);//设置提示框的圆角半径//设置提示框的边框颜色和大小
mytooltip.BorderBrush = System.Windows.Media.Brushes.Yellow ;
mytooltip.BorderThickness = new Thickness (2); 以上所有后台代码设置均可以在前台实现同样的设置
部分前台设置如下:
<lvc:CartesianChart.AxisY>
<lvc:Axis Title="star" LabelFormatter="{Binding Formatter}" ></lvc:Axis>
</lvc:CartesianChart.AxisY>
完整代码
<Window x:Class="chart_line.MainWindow"
xmlns="http://schemas.microsoft.com/winfx/2006/xaml/presentation"
xmlns:x="http://schemas.microsoft.com/winfx/2006/xaml"
xmlns:d="http://schemas.microsoft.com/expression/blend/2008"
xmlns:mc="http://schemas.openxmlformats.org/markup-compatibility/2006"
xmlns:local="clr-namespace:chart_line"
xmlns:lvc="clr-namespace:LiveCharts.Wpf;assembly=LiveCharts.Wpf"
mc:Ignorable="d"
Title="MainWindow" Height="350" Width="525">
<Grid x:Name="grid">
<lvc:CartesianChart x:Name="mychart" Series="{Binding SeriesCollection}" >
<lvc:CartesianChart.AxisX>
<lvc:Axis x:Name="myaxisx"/>
</lvc:CartesianChart.AxisX><lvc:CartesianChart.AxisY>
<lvc:Axis Title="star" LabelFormatter="{Binding Formatter}" ></lvc:Axis>
</lvc:CartesianChart.AxisY>
<lvc:CartesianChart.DataTooltip>
<lvc:DefaultTooltip x:Name="mytooltip"  />
</lvc:CartesianChart.DataTooltip>
</lvc:CartesianChart>
</Grid>
</Window>
using LiveCharts;
using LiveCharts.Wpf;
namespace chart_line
{
/// <summary>
/// Interaction logic for MainWindow.xaml
/// </summary>
public partial class MainWindow : Window
{
public SeriesCollection SeriesCollection { get; set; }
public Func<double, string> Formatter { get; set; }
public MainWindow()
{
InitializeComponent();
LineSeries mylineseries = new LineSeries();
mylineseries.Title = "night";mylineseries.Stroke = System.Windows.Media.Brushes.Blue ;
mylineseries.StrokeThickness = 10;mylineseries.StrokeDashArray = new System.Windows.Media.DoubleCollection { 2 };
mylineseries.LineSmoothness = 1;mylineseries.Fill = System.Windows.Media.Brushes.LightBlue ;//mylineseries.PointGeometry = null;
mychart.LegendLocation = LegendLocation.Top ;mychart.Background = System.Windows.Media.Brushes.Gray ;
myaxisx.Separator.StrokeThickness = 10;myaxisx.Separator.Stroke= System.Windows.Media.Brushes.Red;
myaxisx.Separator.Step = 0.5;myaxisx.Title = "Date";myaxisx.Position = AxisPosition.RightTop;//myaxisx.IsMerged = true;
myaxisx.LabelsRotation = 45;myaxisx.Labels = new[]{ "Mon", "Tue","Wen","Thu","Fri","Sat","Sun"};
//mytooltip.BulletSize = 10;
mytooltip.Background = System.Windows.Media.Brushes.LightCyan ;
mytooltip.SelectionMode = TooltipSelectionMode.OnlySender;mytooltip.CornerRadius = new CornerRadius(5);mytooltip.BorderBrush = System.Windows.Media.Brushes.Yellow ;
mytooltip.BorderThickness = new Thickness (2);
double[] mynum = { 1, 3, 1, 6, 2, 9, 4 };
mylineseries.Values = new ChartValues<double> ( mynum );
Formatter = value => value + "-N";
SeriesCollection = new SeriesCollection {mylineseries};
DataContext = this;
}
}
}
XAML
作为XAML语言的一条规则,必须完全在该对象元素上的任何其他属性元素之前或之后完全指定XAML内容属性的值。例如,以下标记不会编译。
<Button>I am a
  <Button.Background>Blue</Button.Background>
  blue button</Button>
WPF控件
Slider
设置整数
这个控件上值默认是浮点数,改变它的值可以拖动滑块,也可以在具有焦点的时候使用键盘,还可以点击滑块两侧的空白处(类似滚动条),值的步进有两个属性控制LargeChange和SmallChange,默认值分别是1和0.1,所以会出现1.3543这种情况,不过完全可以自定义的,添加代码:
Ticks="1 2 3 4 5" //这个就是步进值的设置
IsSnapToTickEnabled="True" //还要加上这一句才有效果
或者
SmallChange="1"
IsSnapToTickEnabled="True"
Border
border作边框使用
BorderBrush="Black"//设置边框颜色
BorderThickness="2"//设置边框粗细
TextBlock
TextBlock换行
新建一个TextBlock作为最基础的一个控件,他所携带的功能相对于其他的控件要来的比较少,
比较值得关注的属性出了布局用的以外和数据绑定意外,就只剩下的Text属性来。
TextBlock的默认内容属性是Text。
对于换行来说,需要关注的也就是Text和Inline2个属性。
常见的TextBlock换行方法
1)转义字符换行
在XAML的后台文件中加入代码
Me.TextBlock1.Text = "AAAAAAA " + vbCrLf + "BBBBBBBB"
this.TextBlock1.Text = "AAAAAAA\nBBBBBBBB";
在XAML上写时
<TextBlock Text="AAAAAAA
BBBBBB"   Height="198" HorizontalAlignment="Left"
           Margin="30,27,0,0" Name="TextBlock1" VerticalAlignment="Top" Width="436" >       	</TextBlock>
这样就可以表示显示的表示换行了,
但是下面这种情况是无效的。
        <TextBlock  Height="198" HorizontalAlignment="Left"
                   Margin="30,27,0,0" Name="TextBlock1" VerticalAlignment="Top" Width="436" >
            AAAAAAA
BBBBBB
        </TextBlock>
在Text的内容里赋值时候,会按照XML去解析,所以对于XML的转义字符都会起到他们的作用,而上面这种情况,虽然这种写法是
是默认获取TextBlock的内容属性,但是在赋值过程中会经过Convert按照String来处理,字符串中解析到换行符时,默认转成了空格。
所以你看到的结果AAAAAAA和BBBBBB并没有被换行表示,只是中间隔了一个空格。
另外XML的转义字符:
空格 ( )
Tab (	)
回车 (
)
换行 (
)
2)设置属性,自动换行
因为TextBlock有TextWrapping属性的支持,根据控件宽度自动设置换行,没有特殊要求的时候,这基本上能满足需求
<TextBlock  Height="49" HorizontalAlignment="Left"
           Margin="30,27,0,0" Name="TextBlock1" VerticalAlignment="Top" Width="60" TextWrapping="Wrap">
    AAAAAAABBBBBB
</TextBlock>
3)使用InLines属性的LineBreak来换行
简单的来说就是,显示的XAML表示用
<TextBlock  Height="49" HorizontalAlignment="Left"
           Margin="30,27,0,0" Name="TextBlock1" VerticalAlignment="Top" Width="60" TextWrapping="Wrap">
    <Run>AAAAAA</Run>
    <LineBreak/>
    <Run>BBBBBB</Run>
</TextBlock>
后台代码添加
TextBlock1.Inlines.Add(New Run("AAAAAA"))
TextBlock1.Inlines.Add(New LineBreak())
TextBlock1.Inlines.Add(New Run("BBBB"))
另外如果RUN里面有大量的文字表示,超过了TextBlock的Width时候,文字会被剪切掉,而不是自动换行,这点需要注意一下
WPF美化
MaterialDesignInXaml
美化包:MaterialDesignInXaml
导入包:管理Nuget程序包中搜索美化包名
使用前添加引用:
xmlns:materialDesign="http://materialdesigninxaml.net/winfx/xaml/themes"App.xaml文件添加引用:
<ResourceDictionary>
            <ResourceDictionary.MergedDictionaries>
                <ResourceDictionary Source="pack://application:,,,/MaterialDesignThemes.Wpf;component/Themes/MaterialDesignTheme.Light.xaml" />
                <ResourceDictionary Source="pack://application:,,,/MaterialDesignColors;component/Themes/Recommended/Primary/MaterialDesignColor.DeepPurple.xaml" />
                <ResourceDictionary Source="pack://application:,,,/MaterialDesignColors;component/Themes/Recommended/Accent/MaterialDesignColor.Lime.xaml" />
                <ResourceDictionary Source="pack://application:,,,/MaterialDesignThemes.Wpf;component/Themes/MaterialDesignTheme.Defaults.xaml" />
            </ResourceDictionary.MergedDictionaries>
            </ResourceDictionary>
<Grid Name="myGrid" Width="auto" ShowGridLines="False" Background="AliceBlue">
<Grid.RowDefinitions>
<RowDefinition Height="150"/>
<RowDefinition Height="75"/>
<RowDefinition Height="75"/>
<RowDefinition Height="80"/>
<RowDefinition Height="150"/>
</Grid.RowDefinitions>
<Grid.ColumnDefinitions>
<ColumnDefinition Width="200"/>
<ColumnDefinition Width="*"/>
<ColumnDefinition Width="200" />
</Grid.ColumnDefinitions>
<!--为什么放大窗口后textbox比textblock要长??-->
<TextBlock Grid.Row="0" Grid.Column="1" Text="登录SwissArmyKnife系统" FontSize="32" TextAlignment="Center" Margin="0,70,0,30"/>
<TextBox Grid.Row="1" Grid.Column="1" Text="请输入账号" FontSize="32" Margin="50,15"/>
<PasswordBox Grid.Row="2" Grid.Column="1" ToolTip="请输入密码" Margin="50,15" FontSize="32"
x:Name="FloatingPasswordBox"
materialDesign:HintAssist.Hint="请输入密码"
materialDesign:HintAssist.Foreground="Green"
materialDesign:TextFieldAssist.UnderlineBrush="Green"
Style="{StaticResource MaterialDesignFloatingHintPasswordBox}" />
<Button Grid.Row="3" Grid.Column="1" Content="登录" FontSize="20" Margin="40,15" />
</Grid>简单对话框
来自:https://blog.csdn.net/bondw/article/details/102762482
效果图:
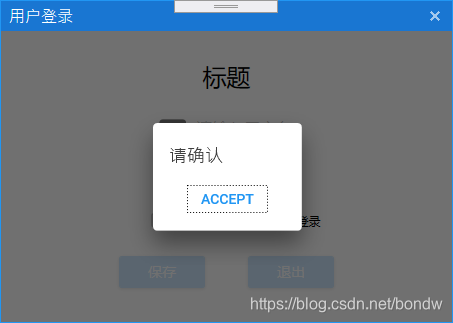
定义对话框模板SampleMessageDialog.xaml
注意需要向解决方案添加用户控制窗口,否则会报错
<UserControl x:Class="test.SampleMessageDialog"
    xmlns="http://schemas.microsoft.com/winfx/2006/xaml/presentation"
    xmlns:x="http://schemas.microsoft.com/winfx/2006/xaml"
    xmlns:mc="http://schemas.openxmlformats.org/markup-compatibility/2006"
    xmlns:d="http://schemas.microsoft.com/expression/blend/2008"
    xmlns:materialDesign="http://materialdesigninxaml.net/winfx/xaml/themes"
    mc:Ignorable="d" d:DesignHeight="300" d:DesignWidth="300" MaxWidth="400">
    <Grid Margin="16">
        <Grid.RowDefinitions>
            <RowDefinition />
            <RowDefinition />
        </Grid.RowDefinitions>
        <TextBlock x:Name="Message" Margin="0 6 0 0" FontSize="18" Grid.Row="0" />
        <Button Grid.Row="1" IsDefault="True" Style="{DynamicResource MaterialDesignFlatButton}" HorizontalAlignment="Right" Margin="16 16 16 0" Command="{x:Static materialDesign:DialogHost.CloseDialogCommand}">
            ACCEPT
        </Button>
    </Grid>
</UserControl>
对应的SampleMessageDialog.cs
using System.Windows.Controls;

namespace test
{
    /// <summary>
    /// Interaction logic for SampleMessageDialog.xaml
    /// </summary>
    public partial class SampleMessageDialog : UserControl
    {
        public SampleMessageDialog()
        {
            InitializeComponent();
        }
    }
}
对应的函数
public async void MessageTips(string message, object sender, RoutedEventArgs e)
{
	var sampleMessageDialog = new SampleMessageDialog
	{
		Message = { Text = message }
	};
	await DialogHost.Show(sampleMessageDialog, "RootDialog");
}
在需要的位置使用
MessageTips("请确认", sender, e);坑
直接用,会报错:
System.InvalidOperationException:“No loaded DialogHost instances.”
原因是对话框放置的位置找不到,这个放置的位置就是这里的 RootDialog
await DialogHost.Show(sampleMessageDialog, "RootDialog");需要在windows.xaml里设置,把GRID内容放入到如下容器里面
<materialDesign:DialogHost Identifier="RootDialog">
......
</materialDesign:DialogHost>
导入ttf
因为实现ImageButton接触ttf在wpf中的使用,ttf是图标按钮的集合文件。可在阿里www.iconfont.cn网站选择下载。首先选择所需图标添加到购物车,选择完成后从购物车中选择“下载代码”,便可将其中的图标打包生成ttf文件并下载至本地。下载的文件夹中包含图一所示文件,其中iconfont.ttf是程序所需文件,打开该文件可看到“字体名称”,程序根据该名称查找ttf文件。程序中引用该文件首先需将该字体包设置为Resource,如FontFamily。
c#代码中的引用格式为“#”+”字体名称”。iconfont.cn中下载的字体名称一般都是“iconfont”,所以引用时使用“#iconfont”即可,实例截取:component/Resources/#iconfont”。

图中的demo_unicode.html包含了ttf文件中的unicode编码,如图二所示。wpf中引用时,在xaml和xaml.cs中的方式有所不同。如arrow-left图标的编码是“”,当在xaml中引用时需要直接复制该编码,而在代码(.cs文件)中引用时,格式为“\ue614”。
具体介绍在App.xaml中设置为程序资源(Application.Resources)的方法及使用步骤:
步骤1,在App.xaml中设置如下,其中ttf资源文件所在目录为WpfUI/Resources/,WpfUI是项目名称,iconfont.ttf是字体库文件名,iconfont是字体库的“字体名称”。
<Application.Resources>
        <FontFamily x:Key="IconFont">
            pack://application:,,,/WpfUI;component/Resources/iconfont.ttf#iconfont
        </FontFamily>
        <!--其他设置-->
</Application.Resources>
步骤2,在xaml中应用到目标,以设置MenuItem图标为例
<MenuItem Name="menuItem1" Header="Icon示例" Icon="" FontFamily="{StaticResource IconFont}"当前项目常用图标地址:http://www.iconfont.cn/collections/detail?cid=4215
PanuonUI.Silver
WPF 的第三方UI库,基于PanuonUI拓展开发的
gitee:https://gitee.com/panuon/PanuonUI.Silver
PanuonUI.Silver 2.0手册:https://www.yuque.com/mochengvia/silver2.0
DMSkin
WPF的第三方库,看了下作者的基于自己的DMSkin写的示例程序,特别棒!
已经fork到自己的仓库了: https://github.com/AuntYang/DMSkin
HandyControl
WPF的第三方库,在GitHub上开源的中国开发者开发的第三方库,目前不是特别完善,但每个月都在更新。
HandyControl:https://github.com/HandyOrg/HandyControl
文档:https://handyorg.github.io/handycontrol
MahApps.Metro
WPF的第三方库,同样在Github上开源的免费库,可以在Nuget上添加引用。
MahApps.Metro:https://github.com/MahApps/MahApps.Metro